
se premete enter vi parte il messaggio. Per andare a capo continuando a scrivere un messaggio: shift+enter
convert an ics file to a markdown diary
I. an old solution
Once I thought that the best solution was work with an ics online. The advantage of this is the possibility to access from any device (PC and smartphone). But there were many disadvantages, as I say afterwards.
I keep my previous steps, in casesomeone find it useful.
1) download the ics file
- sudo apt install python3-pip
- sudo pip3 install ics
- create the bash executable file, like this
with google
#!/bin/bash
wget -O diario.ics https://calendar.google.com/calendar/ical/[remote path]/basic.ics
with nextcloud
wget -O diario.ics https://ecloud.global/remote.php/dav/calendars/[vostra user(ad esempio la mail]/personal/?export –user=[il vostro user, come prima]–password=[la vostra password]
2) convert the ics to md
afterwards, after downloading the ics file (in the following example “personal.ics”) you have to concert it to a md file. You can use a code like the folowing, in a python file (we call here “convert-ics.py”) located or linked in the same folder of ics file:
from ics import Calendar

md_template = """
## {name} - {start}
{desc}
{location}
_{categ}_"""

with open("personal.ics") as f:
   cal = Calendar(f.read())

print("# Diario")
for e in sorted(cal.events):
    print(md_template.format(start=e.begin.strftime("%Y-%m-%e"), name=e.name,
                             desc=e.description, location=e.location,
                             categ=e.categories))
and then
python3 convert-ics.py > /[local-path]/local-file.mdII. a new solution: working in local
There were two big disadvantages working on remote
- the privacy: on a remote server other could see my personal data; in local it is more difficult.
- the archiving: there was an impossibility to split the “remote” past (and archive it) from the recent one (at least I didn’t find the way to get this possibility).
Both these disadvantages are solved having my personal ics on local: a) the privacy, because in local I am the only allowed to see my data; b) the archiving, because I can split an ics. This second point deserves some explications.
How to split an ics
If you open an ics with a text editor you will see that items are not in cronological order, so splitting an ics to get the new items separated from the old ones is not simple.
Therfore I converted first of all my ics in a csv file, thanks to this (very “customizable”) site website: IndigoBlue. The resulting csv file can be order cronologically and then splitted.
Afterwards you have to convert the csv (splitted) files to ics files: the best website I found is Manas Tungare. It convert perfectly your csv in a ics. Be careful: the date format must be 2021/07/07 and not, i.g., 2021-07-07; read carefully the instructions, in particular the required columns (and its names).
Finally you can convert the ics-archive to markdown, following the above step (convert the ics to md).
III. new perspectives
As long as there are tons of issues with python and the above way to convert an ics to markdown, you could use a new way, quite simple and probably better: convert a csv file to markdown, using a tool like Kate and regex.
embed database data in odt file
the problem
In odt it is possible to insert some database data as fields in a odt file, but when you change data in phpmyadmin I get
1) a correct update in the data source view above the text,
2) not in the odt file (body: where
are the fields): the fields texts remain unchanged, even after doing the
command “update fields” (both from menu and from keyboard: F9, or
shift+ctrl+F9).
a solution
A workaround is to use insert – section to insert a part of a php file via localhost.
- you will see in your odt file the content of the (section=div, of the) php file, as in the picture following:

- insert -> section -> link -> file name “http://localhost/[path]/[filename].php” -> section (the “id” name you have chosen in php file, i.g. inserting a <div id=”biblio”>[php/mysql code]</div> the section name will “biblio”)
Of course, you must previously
- activate a php/mysql server in local
- and possibly have some knowledge of html/php source code.
avidemux too slow
It’s better use (one of) the following codecs for encoding
-
x264
-
libavcodec MPEG-1/MPEG-2
-
libavcodec MPEG-4
-
Xvid
so Avidemux will be able to optizmize the CPU usage and will be much faster. And the CPU temperature will be lower.
Cfr.here.
share (embedding) text between odt documents (librewriter)
Impossible use cross-reference or dde-link for more than a paragraph.
So the only way (to share more than a paragraph) are sections:
- define the area you want share in the file A as a bookmark;
- in the file B insert -> section -> as link – choose the file and the bookmark
- the text boormarked in A will be visible in B
n.b.
It is not necessary a master document.
avoid b/w photos in librebase
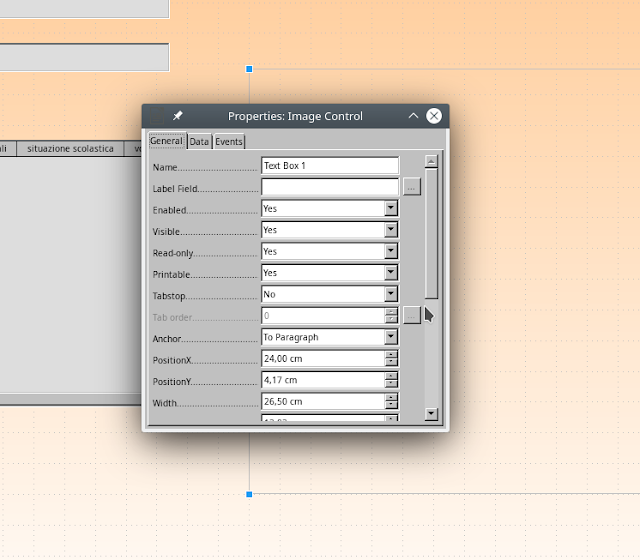
You must set read-only the field of linked pictures, as in the image below:

problems with “locale”
In case of problems with locale (i.g. autokey not starting, or a file with non-latin characters not opening) you can try these commands
- export LC_ALL=”en_US.UTF-8″
- export LC_CTYPE=”en_US.UTF-8
- sudo dpkg-reconfigure locales
calculate age from year of birth
There are two ways:
via php
## 2. in php
You can also use php code, as in the following way
(inspired from this page (https://stackoverflow.com/questions/3776682/php-calculate-age), and _slighty modified_:
$dob =”$row[anno_nascita]”;
$age = date_diff(date_create($dob), date_create(‘now’))->y;
echo “age: $age years
“;
via mysql in phpmyadmin
1.do this sql query:
select *,year(CURDATE())-year(anno_nascita) age from studenti__classi;
2. save the result as view
3. and so you will have, in the view, the age (of your students, i.g.) that can work in LibreBase (to connect with that view).
insert a text as field from an odt to another odt
0. Avoid to copy more than one paragraph: in that case the whole original file will be insert in the destination file.
1. copy an area in original file
2, paste special in destination file (as DDE link)
convert big (text) pdf files to word
This website has converted a big (5mb) text pdf file to word in a very good way.